Beginner’s Guide to the WordPress .htaccess File

Keeping your site safe should be a top priority for every administrator. WordPress is a secure platform out of the box, but that doesn’t mean it’s impervious to attacks. Fortunately, even if you aren’t a security expert, you can use a file called .htaccess to harden your site’s security policies.
.htaccess is a configuration file for the Apache web server, which serves many WordPress sites. It’s a powerful tool that helps safeguard your site and boost its performance through some minor tweaks to its code. By editing this file, you can ban users, create redirects, prevent attacks, and even deny access to specific parts of your site.
An Introduction to the .htaccess File
.htaccess is short for “HyperText Access.” It’s a configuration file that determines how Apache-based servers interact with your site. In simpler terms, .htaccess controls how files in a directory can be accessed. You can think of it as a guard for your site because it decides who to let in and what they’re allowed to do.
By default, an .htaccess file is typically included in your WordPress installation. The main purpose of this file is to improve security and performance. Plus, it also enables you to override your web server’s settings.
You’ll most likely find your .htaccess file in your site’s root directory. Since .htaccess applies to both its own directory and any subdirectories within that main folder, it impacts your entire WordPress site.
It’s also worth noting that the .htaccess file does not have a file extension. The period at the start simply makes sure the file remains hidden.
How to Edit Your WordPress .htaccess File
Editing the .htaccess file is, in practice, as simple as editing any other text file. However, because this is a core file, making changes to it can have unintended consequences.
For this reason, it’s vitally important that you back up your site before you begin, regardless of whether you’re a beginner or an experienced developer.
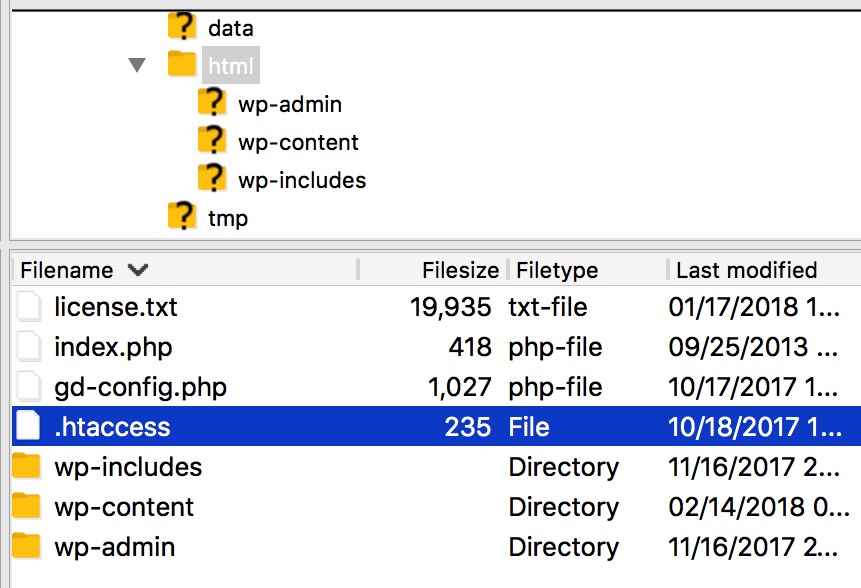
When you’re ready to edit your .htaccess file, you can access it using Secure File Transfer Protocol (SFTP) or Secure Shell (SSH). You will find .htaccess in your site’s root directory:
Open the file using your preferred text editor, such as TextEdit or Notepad. If the file hasn’t been edited before, you’ll see the following default information:
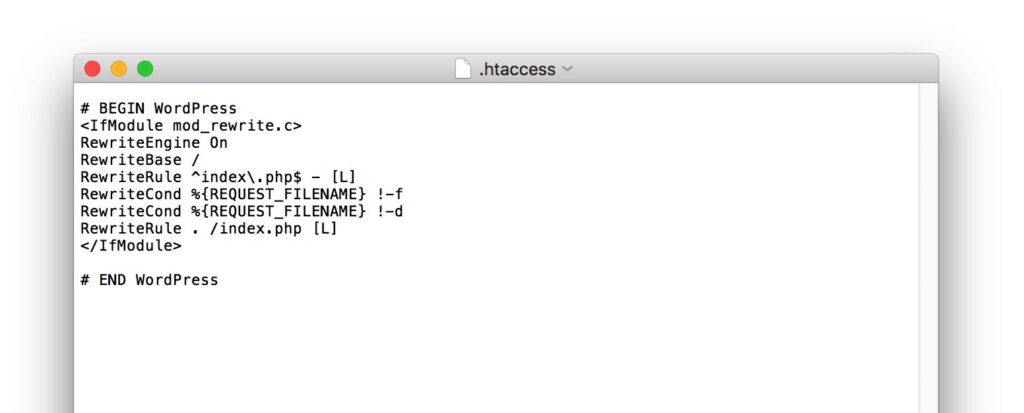
It’s important not to add or change anything between the # BEGIN and # END tags. Instead, all new code should be added after this block.
At this point, all you need to do is add your code and save the file. When you’re including multiple new functions, it’s best to save and test each one separately. If an error occurs, this will make it much easier to troubleshoot which change caused the problem.
While almost all WordPress installations will already contain an .htaccess file, in some cases, you may need to create one. You can do this using a text editor of your choice, as long as you save it with the right file name: .htaccess with no extension.
It’s also important to configure the file’s permission settings correctly. You can then upload .htaccess to your site’s root directory.
9 Things You Can Do With Your WordPress .htaccess File
Now that you’re familiar with the .htaccess file, it’s time to get up close and personal. We’re going to introduce a number of ways you can easily boost your site’s security and performance by editing this file.
Simply use the code snippets we’ve provided below, and remember to create a backup before you start!
1. Deny Access to Parts of Your Site
One of the most useful things you can do with .htaccess is deny access to certain pages and files. There are a few files you should consider hiding in this way for security reasons, such as your wp-config.php file.
You can do this by adding the following code, which will cause a 404 error to appear if anybody attempts to view the file:
<Files ~ "/wp-config.php">
Order Allow,Deny
Deny from All
</Files>
In cases where sensitive data should be hidden, it can be useful to restrict access to the corresponding directory. Since many WordPress sites use the same folder structure, this setup can leave your site vulnerable. If you add the following line, it will disable the default directory listing functionality:
Options -Indexes
This will stop users and robots from viewing your folder structure. If anybody tries to access it, they’ll be shown a 403 error page instead.
2. Redirect and Rewrite URLs
Creating redirects enables you to automatically send users to a specific page. Redirects can be particularly useful if a page has moved or been deleted, and you want users who attempt to access that page to be taken somewhere else.
You can accomplish this with a plugin such as Redirection, but it’s also possible to do it by editing the .htaccess file. To create a redirect, use the following code:
Redirect /oldfile.html http://www.example.com/newfile.html
You can probably see what’s going on here. The first part is the path to the old file, while the second part is the URL you want visitors to be redirected to.
Get Content Delivered Straight to Your Inbox
Subscribe to our blog and receive great content just like this delivered straight to your inbox.
3. Force Your Site to Load Securely With HTTPS
<style>.embed-container { position: relative; padding-bottom: 56.25%; height: 0; overflow: hidden; max-width: 100%; } .embed-container iframe, .embed-container object, .embed-container embed { position: absolute; top: 0; left: 0; width: 100%; height: 100%; }</style><div class=’embed-container’><iframe src=’https://www.youtube.com/embed/QeicRf_Ri3Y’ frameborder=’0′ allowfullscreen></iframe></div>
If you have added an SSL certificate to your domain, such as DreamHost’s free Let’s Encrypt certificate, it’s a good idea to force your site to load using HTTPS. This will ensure that your site is safer for both you and your visitors.
You can make it happen by adding the following code:
RewriteEngine On
RewriteCond %{HTTPS} !=on
RewriteRule ^(.*)$ https://%{HTTP_HOST}%{REQUEST_URI} [L,R=301]
Your site will now automatically redirect any HTTP requests and direct them to use HTTPS instead. For example, if a user tries to access http://www.example.com, they will be automatically redirected to https://www.example.com.
4. Change Caching Settings
Browser caching is a process where certain website files are temporarily saved on a visitor’s local device to enable pages to load faster. Using .htaccess, you can change the amount of time that your files are stored in the browser cache until they are updated with new versions.
There are a few different ways to do this, but for this example, we’ll use a function called mod_headers. The following code will change the maximum caching time for all jpg, jpeg, png, and gif files:
<ifModule mod_headers.c>
<filesMatch "\\.(jpg|jpeg|png|gif)$">
Header set Cache-Control "max-age=2592000, public"
</filesMatch>
We’ve set the maximum time to 2,592,000 seconds, which equates to 30 days. You can change this amount if you want, as well as the file extensions that will be affected. If you want to add different settings for different extensions, simply add more mod_header functions.
5. Prevent Certain Script Injection Attacks
Script injection (or ‘code injection’) attacks attempt to change how a site or application executes by adding invalid code. For example, someone might add a script to a text field on your site and then submit it, which could cause your site to actually run the script.
You can add the following code to protect against certain types of script injection:
Options +FollowSymLinks
RewriteEngine On
RewriteCond %{QUERY_STRING} (\<|%3C).*script.*(\>|%3E) [NC,OR]
RewriteCond %{QUERY_STRING} GLOBALS(=|\[|\%[0-9A-Z]{0,2}) [OR]
RewriteCond %{QUERY_STRING} _REQUEST(=|\[|\%[0-9A-Z]{0,2})
RewriteRule ^(.*)$ index.php [F,L]
Your site should now be able to detect and stop script injection attempts and redirect the culprit to your index.php page.
However, it’s important to note that this example will not protect against all types of injection attacks. While this particular code can certainly be useful, you should not use it as your only protection against this type of attack.
6. Stop Username Enumeration Attacks
Username enumeration is a process where usernames from your site are harvested by looking at each user’s author page. This is particularly problematic if someone manages to find your admin username, which makes it much easier for bots to gain access to your site.
You can help prevent username enumeration by adding the following code:
RewriteCond %{REQUEST_URI} !^/wp-admin [NC]
RewriteCond %{QUERY_STRING} author=\d
RewriteRule .* - [R=403,L]
This will stop certain attempts to enumerate usernames and throw up a 403 error page instead. Bear in mind that this will not prevent all enumeration, and you should test your security thoroughly. We also recommend strengthening your login page further by implementing Multifactor Authentication.
7. Prevent Image Hotlinking
Image hotlinking is a common problem that happens when images on your server are being displayed on another site. You can stop this by adding the following code to .htaccess:
RewriteEngine On
RewriteCond %{HTTP_REFERER} !^$
RewriteCond %{HTTP_REFERER} !^https://(www\.)?example.com/.*$ [NC]
RewriteRule \.(png|gif|jpg|jpeg)$ https://www.example.com/wp-content/uploads/hotlink.gif [R,L]
Replace example.com with your own domain, and this code will prevent images from loading on all other sites. Instead, the picture you specify on the last line will load. You can use this to send an alternative image to sites that try to display graphics from your server.
Beware that this may cause issues when you might want images to appear externally, such as on search engines. You might also consider linking to a script instead of a static image, then respond with a watermarked image or an image containing an ad.
8. Control Your File Extensions
By using .htaccess, you can control how files of different extensions are loaded by your site. There’s a lot you can do with this feature, such as running files as PHP, but we’re just going to look at a basic example for now.
The following code will remove the file extension from PHP files when they’re loaded. You can use this with any file type, as long as you replace all instances of “php” with the extension you want:
RewriteEngine On
RewriteCond %{THE_REQUEST} ^[A-Z]{3,9}\ /.*index\ HTTP/
RewriteRule ^(.*)index$ http://example.com/$1 [L,R=301]
RewriteCond %{REQUEST_FILENAME} !-d
RewriteRule ^([^/]+)/$ http://example.com/$1 [L,R=301]
RewriteCond %{THE_REQUEST} ^[A-Z]{3,9}\ /(.+)\.php\ HTTP/
RewriteRule ^(.+)\.php$ http://example.com/$1 [L,R=301]
RewriteRule ^([a-z]+)$ /$1.php [L]
This will cause all PHP files to load without displaying their extension in the URL. For example, the index.php file will appear as just index.
9. Force Files to Download
Finally, when a file is requested on your site, the default behavior is to display it in the browser. For example, if you’re hosting an audio file, it will start to play in the browser rather than being saved to the visitor’s computer.
You can change this by forcing the site to download the file instead. This can be done with the following code:
AddType application/octet-stream mp3
In this example, we’ve used mp3 files, but you can use the same function for txt, mov, or any other relevant extension.
Improve Your Site’s Security and Performance
The .htaccess file provides flexibility for controlling how your web server behaves. You can also use it to increase your site’s performance and get more control over exactly who can access what information.
With .htaccess, you can deny access to particular parts of your website. Additionally, it allows you to redirect URLs, force your site to load over HTTPS, and prevent some script injection attacks.
Editing your .htaccess file is just one way to improve your site’s security. Choosing a secure WordPress hosting provider is another. Check out our DreamPress managed hosting plans to see how we can boost your website’s security and performance!
Do More with DreamPress
DreamPress Plus and Pro users get access to Jetpack Professional (and 200+ premium themes) at no added cost!