How to Create Anchor Links in WordPress (3 Methods)

Google loves long-form content, and as a result, lengthy articles tend to rank higher on search results pages. The problem is that readers’ attention spans are getting shorter even as search algorithms favor longer content. This means that if you want visitors to find the information they need within your posts and pages, you have to make it easy for them.
That’s where anchor links come in. With this feature, you can send readers toward specific sections (or subheadings) within the same page, often by using a table of contents. That way, visitors can find the exact answers they’re looking for instead of skimming through hundreds or thousands of words.
In this article, we’ll show you how anchor links work and discuss the pros and cons of using them. Then we’ll go over some best practices for using anchor links in WordPress and show you three different ways to add them. Let’s get to work!
What Anchor Links Are
In theory, an anchor link is any link within a page that points to another section on that same page. In most cases, you’ll encounter anchor links within a table of contents at the start of a page or post.
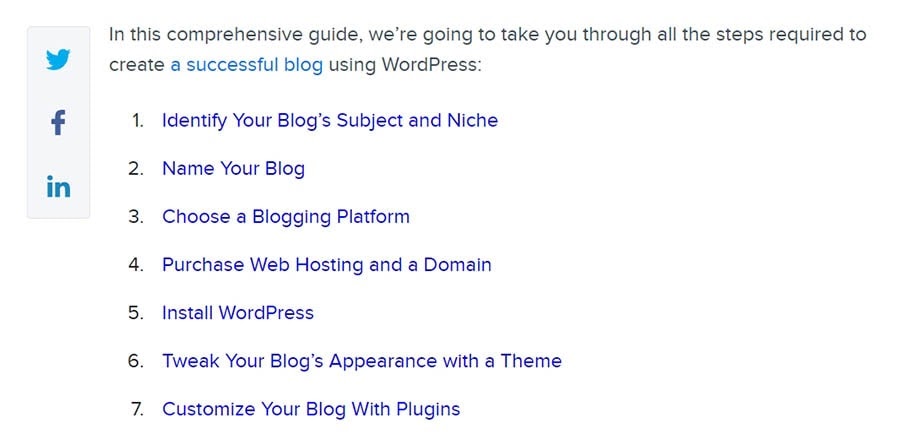
Above you’ll see an example taken from one of our own articles, which covers how to start a blog step by step. It’s a lengthy process, which makes a table of contents with anchor links an essential component.
Other common examples of anchor links include buttons that return you to the top of the page when you reach the bottom. You can also use anchor links to help users navigate long landing pages. Whether there’s a page or post on your website that’s a bit too long for manual scrolling, anchor links can improve the user experience.
WordPress + DreamHost
Our automatic updates and strong security defenses take server management off your hands so you can focus on creating a great website.

The Pros and Cons of Using Anchor Links in WordPress
There are very few downsides when it comes to using anchor text and links in WordPress. Overall, WordPress anchor links make your content easier to navigate. They also offer a host of other benefits. For example:
- Readers can get a quick overview of your content.
- Search engines love lists that sum up a post or page.
- Anchor links can help reduce your website’s bounce rate.
Let’s dig a bit deeper into those last two advantages. It’s important to note that anchor links don’t improve your search engine rankings directly. However, they do provide more context for search engines.
For example, here’s what you’ll see if you Google “how to start a blog with DreamHost”:
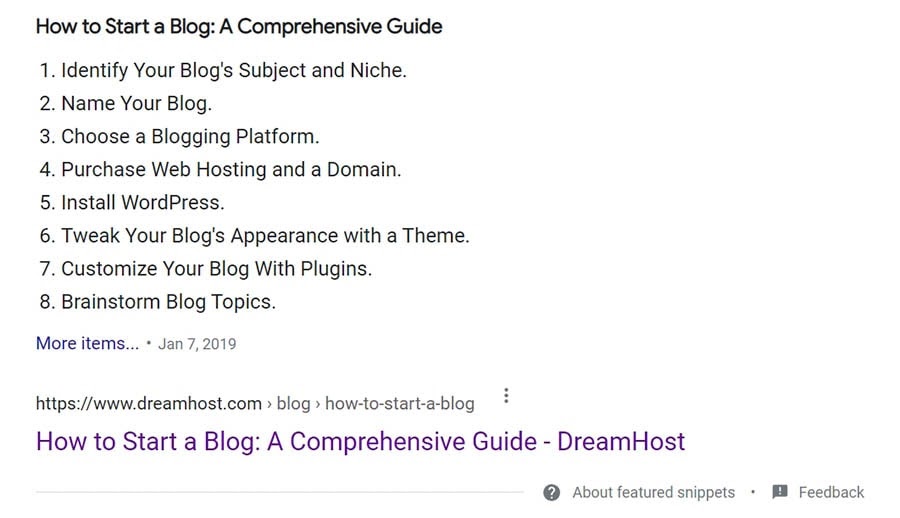
This is a “rich snippet” that includes part of the post’s table of contents, which is made up of anchor links. The snippet doesn’t include the links themselves, but this list helps the blog post demonstrate how comprehensive it is to both search engine bots and human searchers.
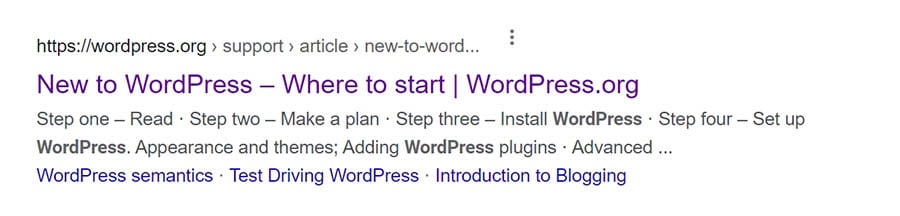
In some cases, Google may actually include anchor links below the meta description within Search Engine Results Pages (SERPs).
Additionally, providing anchor links in the form of a table of contents can help reduce your website’s bounce rate. That’s because you’re making life easier for users who might access the page, assume that it’s not what they’re looking for because they don’t see what they want right away, and leave. Instead, you can keep them around much longer by telling them exactly what they can find within a post or page and linking them to specific sections.
Overall, tables of contents are the best way to leverage anchor links on your website. However, it only makes sense to use anchor links for long pages or blog posts. There’s no hard-and-fast rule, but anything above 1,500 words or so can likely benefit from a table of contents and its corresponding anchor links.
Adding anchor links to shorter content isn’t necessarily bad, but it can be less useful. If readers can scroll through the entirety of a page in one or two wheel turns, there’s little benefit in spending the time to add anchor links.
Related: Take Your Content Strategy Up a Level with a Content Audit
How to Create Anchor Links in WordPress (3 Methods)
Creating anchor links is remarkably simple. You can do so either manually or with the help of plugins. Let’s start by talking about how to add anchor links in WordPress using the Classic Editor.
1. Manually Create an Anchor Link Using the Classic Editor
If you’re still using the Classic Editor, you’ll be happy to know that it makes short work of creating anchor links.
As we mentioned earlier, anchor links point toward specific sections on the same page. However, you can’t simply add a link in WordPress that points toward a phrase or a title and hope the editor knows how to interpret it. That’s because all of the text you see in the editor is powered by HTML.
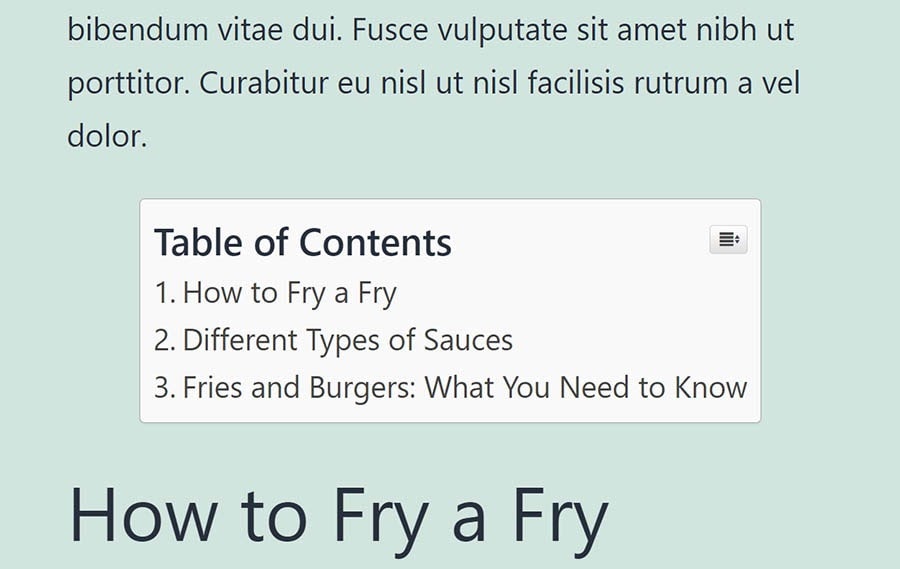
To create an anchor link, you first need to set an anchor. To do that, select a subheading that you want to link to, and switch to the Text view of the editor.
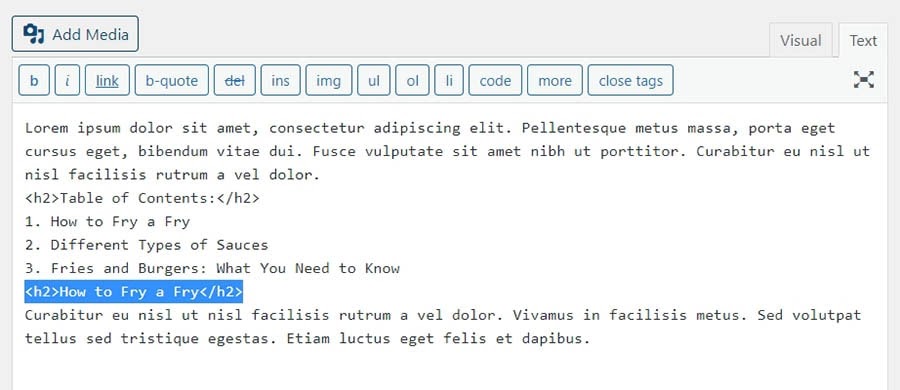
In our example, we’ve selected the following H2 subheading:
<h2>How to Fry a Fry</h2>
What we need to do is add an HTML ID. That ID will be the “anchor” we’re going to link to later on and will be in the form id= “unique-anchor-name”. Here’s what that code should look like:
<h2 id=“fry-a-fry”>How to Fry a Fry</h2>
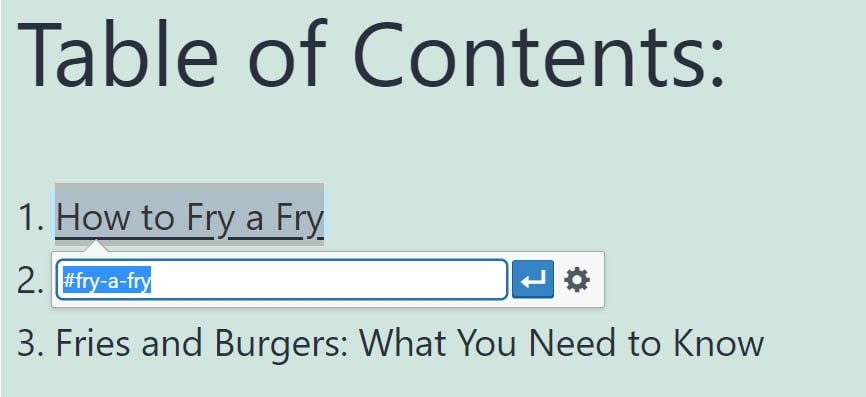
Once the ID is in place, you can add the anchor link to your table of contents (or wherever else you want to place it). In our example, we want to add the link to the first entry in our table of contents.
You can do this within the Text view or the Visual tab. If you’re using the visual editor, simply add the link as normal. However, instead of an URL, you’ll need to specify the HTML ID you’re linking to, preceded by a “#”.
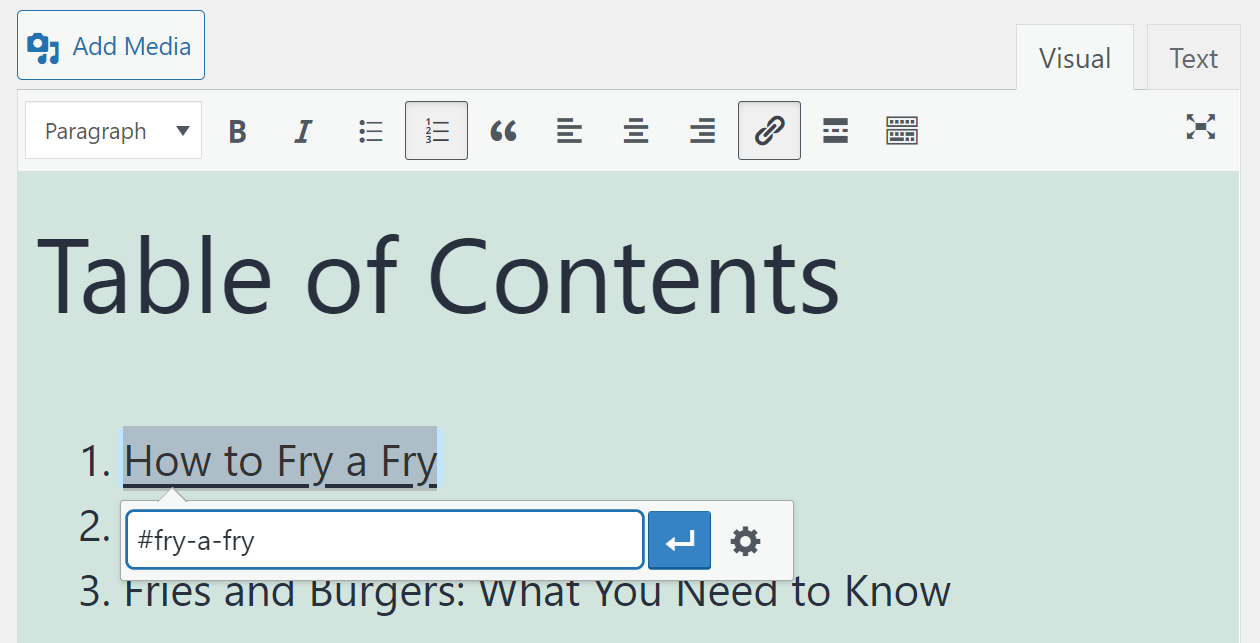
That’s it! When users click on that link within the table of contents, their browser will jump to the corresponding section.
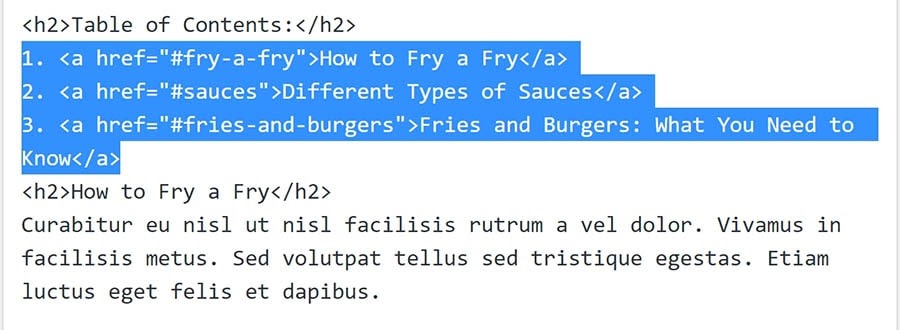
In the Text view, here’s what the HTML for a table of contents full of anchor links will look like:
Manually creating HTML anchor links may seem intimidating if you’re not used to working with code. However, as you can see, adding anchor tags is remarkably simple. Once you know how the process works, adding these links manually should only take seconds.
However, keep in mind that you can only point toward anchors on the same page. If you try to create a link toward an anchor ID located on another page or post, it simply will not work.
Related: 20 Metrics Every Blogger Needs to Track to Measure Success
2. Manually Create an Anchor Link Using the Block Editor
Creating anchor links using the Block Editor is even easier than with its Classic counterpart. That’s because the Block Editor enables you to add HTML anchors or IDs without the need to switch over to the code view.
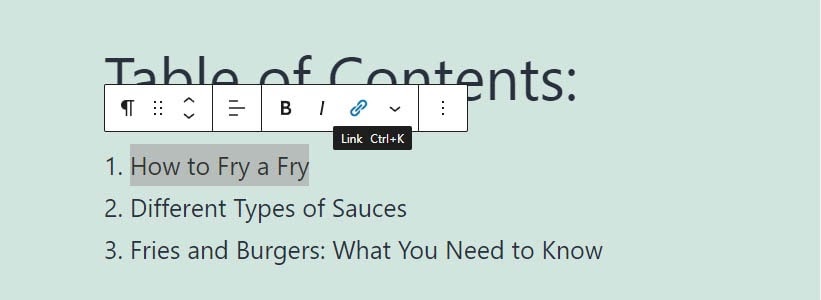
As with the previous method, the first thing you need to do is add an HTML ID or anchor to the text you want to link to. Select the text in the Block Editor, and open the Advanced tab within the Block section to the right.
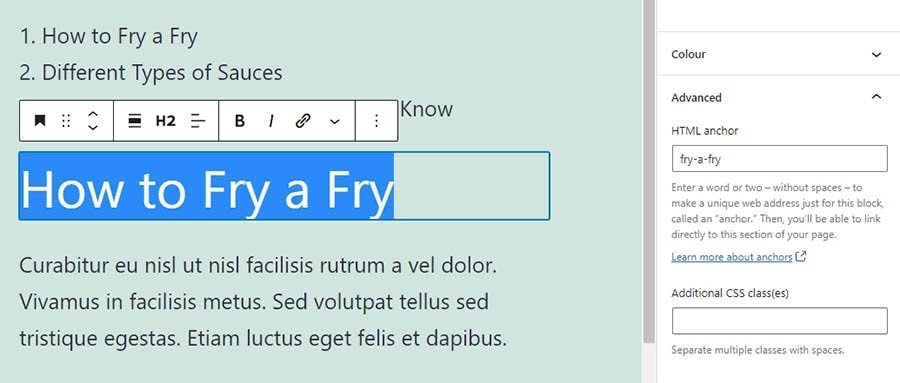
You’ll see a field called HTML anchor. All you need to do is add some unique anchor text within that field, and you’re ready to create the link. Select the text where the anchor link will go, and click on the option to add a link.
Instead of a regular URL, add a link that looks like this:
#anchor-text-goes-here
The link won’t work if you forget to add the “#” sign before the anchor text. Confirm the link, and that’s it.
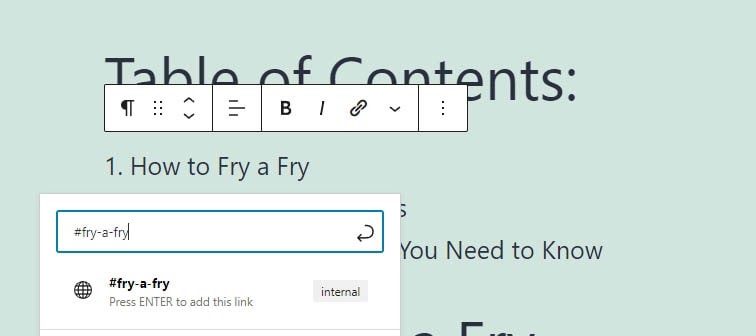
The Block Editor can automatically recognize if a link points to an internal or external page. If it recognizes the anchor text you enter, it will automatically display it as an internal link, as shown in the screenshot above.
All that’s left to do now is repeat the process as many times as you need, depending on how many sections you want to link to. The Block Editor allows you to do this in a matter of minutes, which is perfect if you deal with long-form content on a regular basis.
Related: What Is WordPress Full-Site Editing? And How Will It Affect Your Site?
3. Create an Anchor Link in WordPress Using a Plugin
It shouldn’t come as a surprise that there’s more than one plugin you can use to add anchor links in WordPress. So instead of recommending a single option, we’ll show you how to use two plugins, one geared toward simple anchor links and the other designed for building tables of contents.
Let’s start with the former. The Advanced Editor Tools plugin is a tool that adds a broad range of features to both the Classic and Block Editors.
Add Anchor Links Using the Advanced Editor Tools Plugin

However, it’s worth noting that this plugin only offers an option for adding anchor links in the Classic Editor.
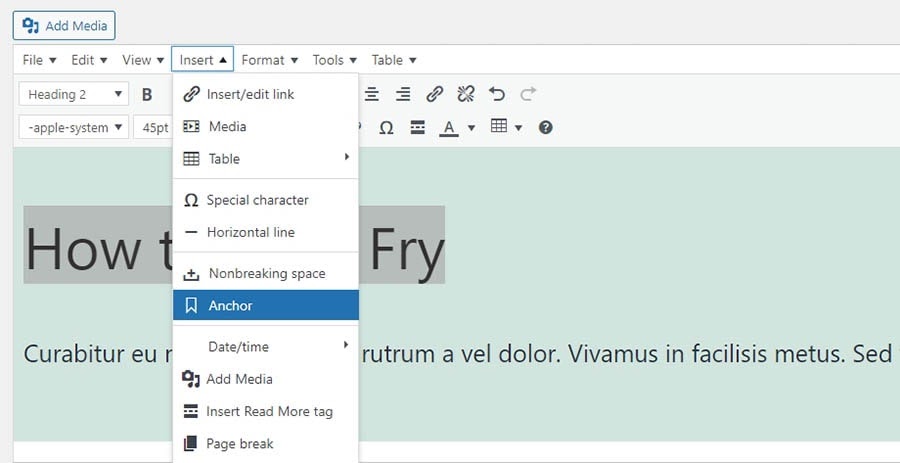
To see that feature in action, open the Classic Editor and select the text you want to add an HTML anchor to. You’ll see a new menu on top of the default Classic Editor formatting options. Select Insert and click on Anchor.
That option will open a simple pop-up, which you can use to specify the anchor ID you want to use.
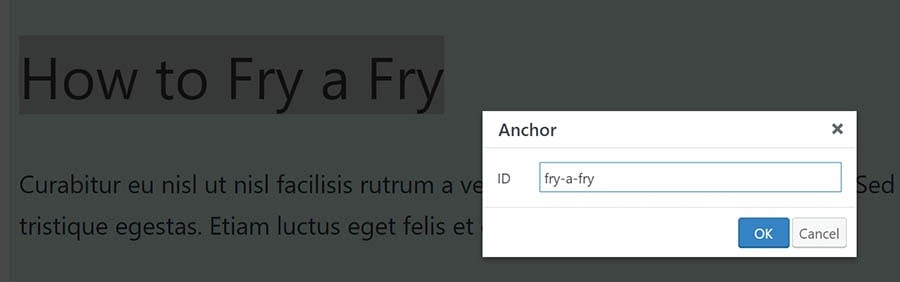
Click OK, and you just added an HTML ID in the Classic Editor without needing to tinker with code.
Now, go ahead and add a link that points toward this anchor anywhere you want within the same page.
Advanced Editor Tools adds plenty of other features to the Classic Editor. You can read about them on the plugin’s official page. For now, let’s explore a different approach to adding anchor links in WordPress using plugins.
Related: The Beginner’s Guide to WordPress Plugins
Create a Table of Contents Using the Easy Table of Contents Plugin
Creating a table of contents for each of your posts can be a lot of work. You have to add multiple anchor IDs manually and create links one by one. Moreover, you might also want to style the table of contents so it doesn’t look like a regular list within a post.
One way to tackle that process more efficiently is by using a plugin such as Easy Table of Contents. This plugin can help you automatically generate tables of contents for posts and pages within your website.

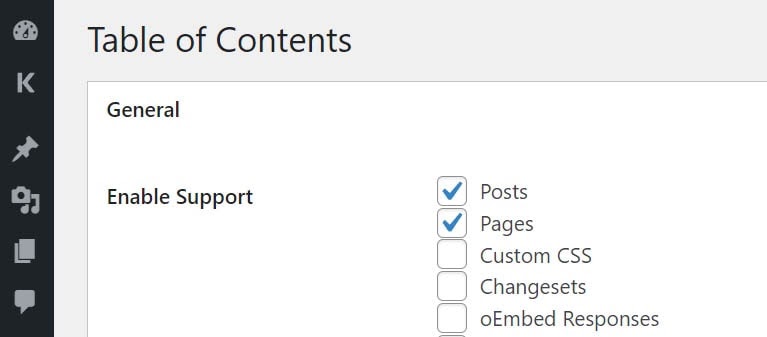
After you activate the plugin, you’ll need to configure its settings. Go to Settings > Table of Contents, and look for the section that says Enable Support at the top of the page. By default, the plugin will only work for pages, so you may want to enable its functionality for posts as well.
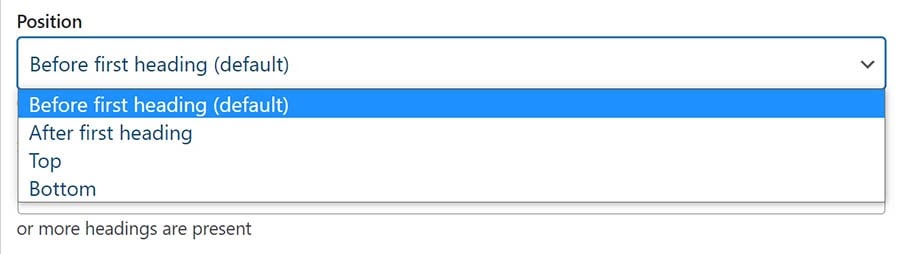
Now scroll down to the Position and Show when settings, which are right next to each other. The Position setting will enable you to decide where to display your tables of contents. By default, they’ll show up on posts and pages right before the first heading.
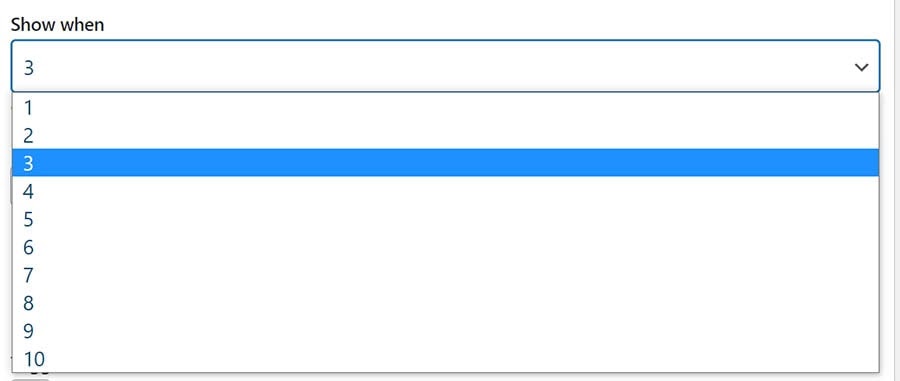
The Show when setting lets you decide how many headings a post or page needs for the plugin to display a table of contents. By default, the plugin sets that number to four, but you can change it.
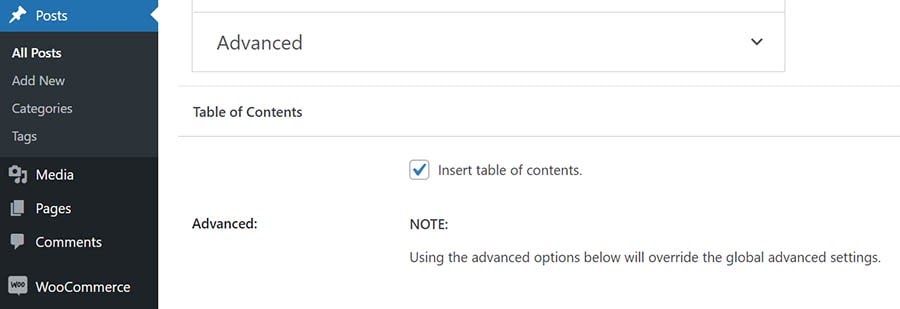
Once you configure those settings, save your changes and go to the post or page where you want to add the table of contents. Open the Block Editor and scroll down to the bottom of the page. There you’ll see a new section called Table of Contents. There should be an option at the top to insert a table of contents for that post or page.
The plugin will automatically set anchor IDs and generate a full table of contents leading to them. That table will include any subheadings within the post or page that you add it to unless you choose to exclude some of them.
Although the plugin includes an option for adding tables of contents automatically, we recommend that you decide which posts to use it for manually. This only takes a second, and you’ll avoid generating tables of content for posts or pages that don’t need them.
Finally, if you’re not happy with the plugin’s default style for its tables of contents, you’re free to change it. The plugin’s Settings screen includes several options for modifying the appearance of its tables.
You Dream It, We Code It
Tap into 20+ years of coding expertise when you opt for our Web Development service. Just let us know what you want for your site — we take it from there.

Check Out Our Other WordPress Tutorials
If you want to learn more about improving the WordPress user experience and your site’s SEO, here are a few additional tutorials you may want to check out:
- 17 SEO Tools to Optimize Your Website for Success in 2021
- Let’s Take a Look at SEO Trends: How to Rank Higher in 2021
- The 11 Most Important SEO Metrics to Track
- 13 Simple Ways to Boost SEO on Your WordPress Website
- 5 No-Brainer SEO Tips for Total Beginners
Using anchor links is just one of the many tricks you can implement to improve your website’s search engine rankings. The more you understand SEO, the easier it will be to create search-engine-friendly content from the moment you publish it.
Conclusion
Anchor links are incredibly useful elements for helping users navigate complex pages and long-form content. You can use anchor links in tables of contents, navigation menus, footnotes, and more.
Most importantly, WordPress makes it incredibly simple to add anchor links to your content. Let’s recap the three ways you can add anchor links in WordPress:
- Add anchor links manually using the Classic Editor.
- Add anchor links manually using the Block Editor.
- Create anchor links using plugins such as Advanced Editor Tools and Easy Table of Contents.
Are you looking for a WordPress host that can help you serve long-form content to thousands of visitors without slowing down your site? DreamHost plans are designed to handle large amounts of traffic while keeping your website fast. Check out one of our WordPress hosting packages today!