How To Create A WordPress Plugin (Beginner’s Guide)

One of the main reasons that WordPress is so popular is its open-source nature.
Because of that, at the time of this writing there are over 60,000 WordPress plugins that have been developed for the internet’s favorite content management system (CMS).
And you can join in on the fun by creating your own WordPress plugin.
Fortunately, WordPress makes the process pretty easy. Some coding knowledge will be needed, but it’s not terribly hard to learn how to create a basic plugin to add additional functionality to your website. And if it goes really well, you may even be able to sell it to others and turn your project into a side hustle!
Ready to learn more about why you might want to create a WordPress plugin, as well as how to develop your own?
You’re in the right place!
A Quick Intro To WordPress Plugins
WordPress has a market share of nearly 63% among all CMSes, making it the most popular option by a landslide.
WordPress
WordPress is an open-source Content Management System (CMS). Since it is free and accessible, WordPress is used to power almost any type of website, from blogs to e-commerce businesses.
Read MoreAs mentioned earlier, WordPress is an open-source software platform. That means its source code, plugins, and themes are available for anyone to work with and modify as they see fit.
Note: There’s a difference between WordPress.com and WordPress.org. The .org version is the open-source option that’s free to download and use to create a custom site. It’s the version we’ll cover in this post. The .com version is a hosted site builder with which you can create a limited site for free.
WordPress plugins are packages of code that extend the functionality of a WordPress site. They’re created by different developers all around the world and are designed for a variety of purposes.
For instance, in the existing plugin library you’ll find options for adding social media share buttons, adding newsletter signup forms to your sidebar, improving website search engine optimization (SEO), turning WordPress into a full-blown ecommerce site, and much more.
The WordPress plugin ecosystem empowers those without coding knowledge to create and customize powerful websites. Additionally, it offers almost limitless opportunities for pro developers and web enthusiasts alike.
Get Content Delivered Straight to Your Inbox
Subscribe to our blog and receive great content just like this delivered straight to your inbox.
Why Develop A WordPress Plugin?
WordPress has one of the largest markets for developers. This means you’ll find plenty of resources to help you develop the exact plugin you need to optimize your website. (But don’t worry, we’ll also detail the process here soon!). You won’t find that level of support on many other website-building platforms.
The magic of WordPress is that you can develop a solution for your own site and you don’t have to share it on the plugin market. However, many developers choose to make their plugins available to others to help them work around similar issues as those the developers encountered.
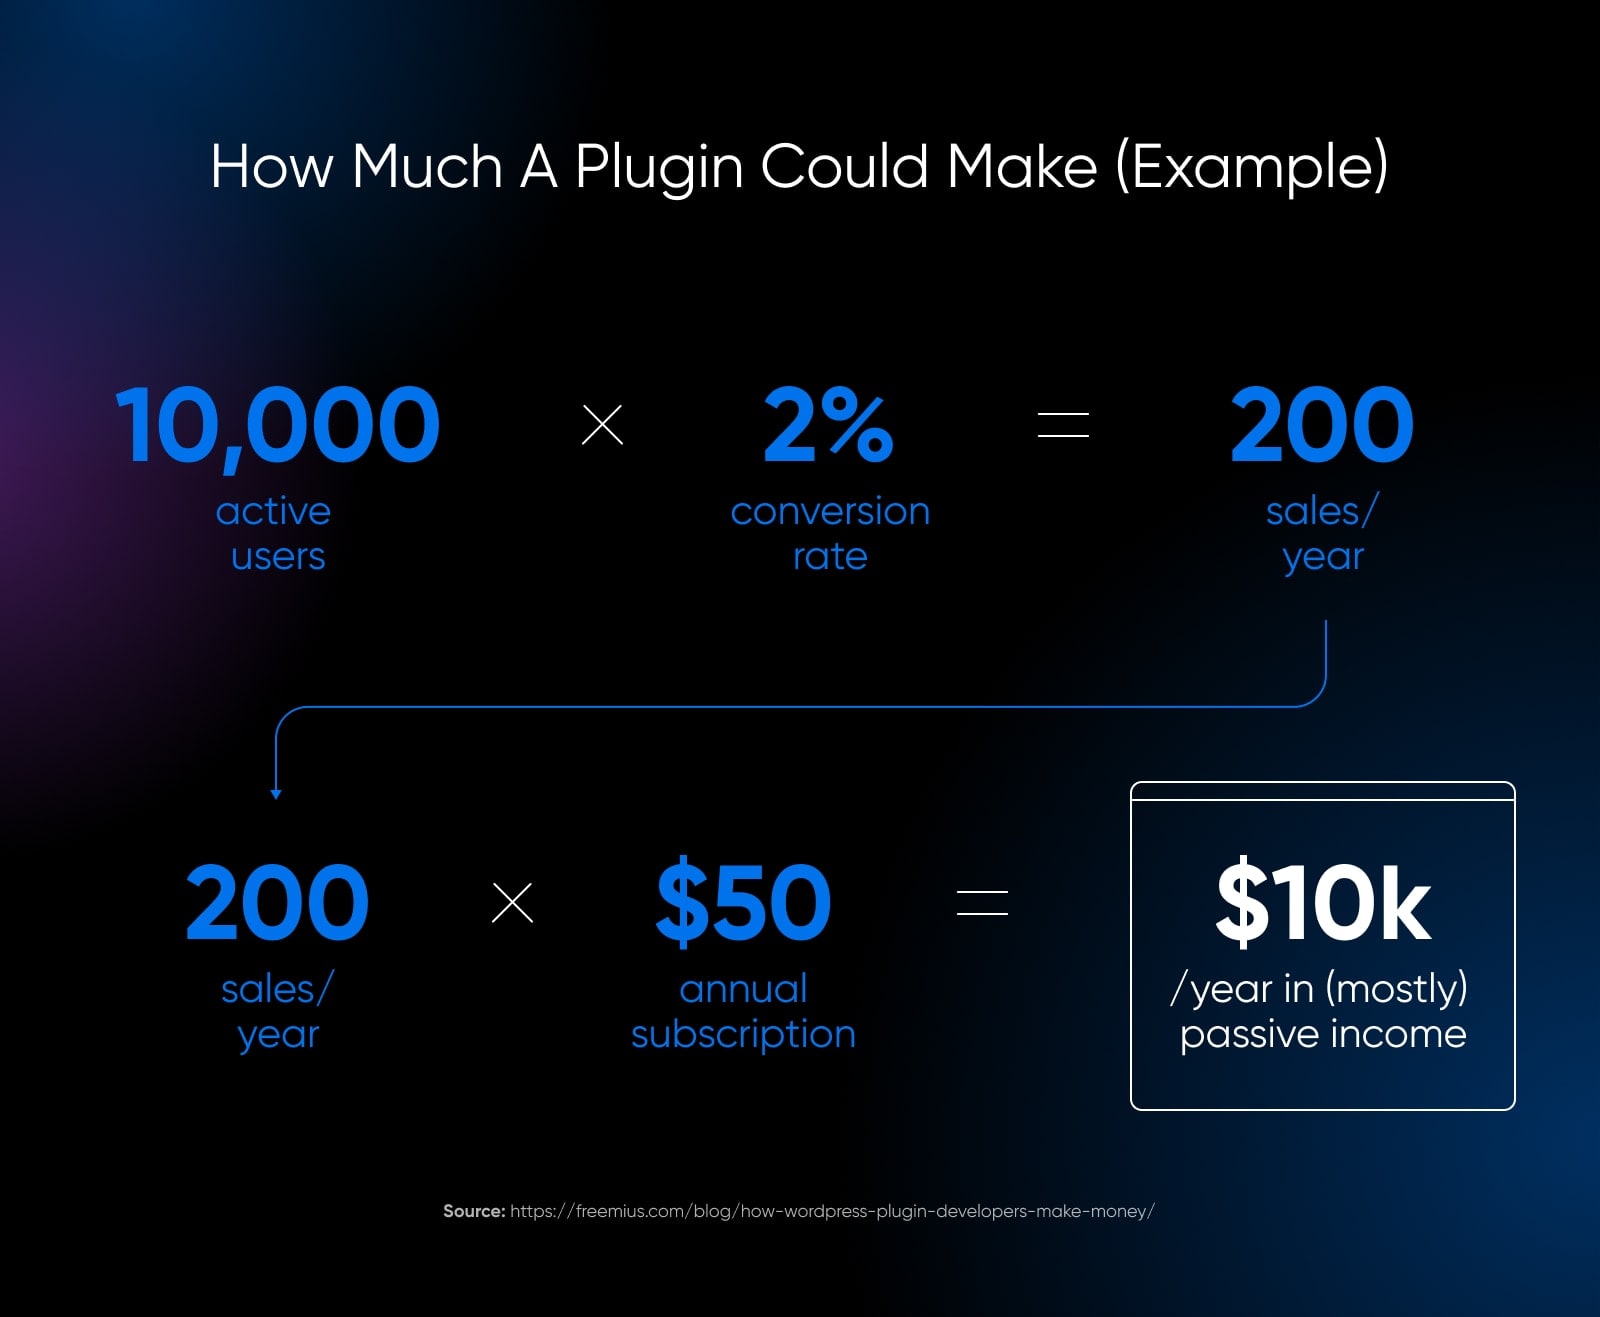
If you do choose to offer your plugin to others, there’s some earning potential associated with WordPress plugins because of the massive user base.
While there’s no shortage of competition, if you have a new or better solution to a common problem, you could find your plugin downloaded for thousands of sites. With a great plugin, the right pricing strategy, and some marketing efforts, a plugin could turn into a nice passiveish income stream.
Lastly, WordPress is an ideal platform for learning how to code. Because it has been around for over 20 years, there’s a seemingly limitless number of resources both on and off WordPress to help you get the hang of development.
Speaking of resources, let’s dive into everything you need to know to create your very own WordPress plugin.
How To Create a WordPress Plugin (6 Steps)
While different plugins will require different amounts of coding and know-how, they all tend to follow this same general development process.
Step 1: Do Your Research And Planning
Like we said, there are numerous tools in the WordPress plugin directory — tens of thousands of them in fact. Therefore, the first thing you’ll want to do is do some research to see if your idea already exists.
Even if it does, you could still proceed with your plan, provided that you make some tweaks so that you’re not creating an exact replica. Explore similar plugins and find out how you might be able to improve upon them. Alternatively, you could complement what’s already available with something like your own custom post type — say, to help keep a diary of your media consumption — or additional features.
You might also want to check the status of existing plugins. For instance, if a plugin hasn’t been updated in some time or isn’t compatible with the latest version of WordPress, there might be an opportunity to provide a better solution.
You can also look at the number of active installations to see if there’s a big market for the type of plugin that you have in mind. This can help you decide if it’s worth the effort if you’re looking to earn money. It’s also a good idea to test the plugin on your own site to see what it does well and what could be done better.
Finally, before diving into the build, you’ll want to read up on the WordPress Coding Standards. This is particularly important if you’re planning to share or sell your plugin. These coding standards are a set of guidelines and best practices that developers should try to adhere to when creating themes and plugins for WordPress.
Related: Want To Learn WordPress? Start With These Resources
Step 2: Set Up A Testing Environment
The next step is to set up a testing environment.
As a beginner, you’re likely to learn (and maybe break) a few things along the way. You don’t want to experiment on your live website that any internet user can see. A local environment — a staging website — will enable you to test your plugin privately as you work on it.
We endorse using Local to create a WordPress site on your computer. It offers a straightforward, user-friendly development environment that offers powerful yet flexible tools for most people.
You can also create an online staging environment. With DreamHost web hosting, you can easily create a staging WordPress site where you can test your plugin without breaking your live site or interrupting your visitors’ user experiences.
Step 3: Create Your Plugin File
Once you have your staging environment set up, it’s time to use it to create your plugin.
The first step is to create a folder for it in your site’s directory.
You can use an FTP/SFTP client like FileZilla to access your site’s files and folders. Or, you may be able to tap into your site via the file manager provided in your hosting account. For DreamHost users, our guide to using the website file manager will help you use our built-in file manager.
Once you’ve connected to your site’s directory, navigate to wp-content/plugins and create a new folder for your plugin.
Next, you’ll need to create a PHP file to add to this folder. To do this, open your preferred text editor and enter the following information:
<?php
/**
* Plugin Name: test-plugin
* Plugin URI: https://www.your-site.com/
* Description: Test.
* Version: 0.1
* Author: your-name
* Author URI: https://www.your-site.com/
**/
Of course, you’ll need to change the above information to match your details. When you’re ready, you can save your file. Remember to use the file extension “php” (e.g., my-first-plugin.php).
Then, you’ll need to upload this file to the plugin folder that you just created at wp-content/plugins. Once you’ve done this, navigate to your test site’s WordPress dashboard and go to the Plugins page.
Here, you should be able to see your new plugin!
This plugin won’t do anything yet if you were to activate it. However, WordPress will recognize it as a functional add-on from this point forward.
Step 4: Add Code To Your Plugin
Every plugin is different. However, they all share common components. For instance, all plugins use hooks to interact with WordPress.
Hook
WordPress hooks are pieces of code that allow you to modify the CMS and add new features to it without tinkering with core files. Hooks make this possible by enabling you to “hook” custom code into pre-defined spots in WordPress.
Read MoreA hook is how a plugin connects to the pre-existing code of WordPress’s core programming. In other words, the hook is the anchor point where a plugin inserts itself in order to add or change the functionality of a site.
Hooks are an important part of WordPress development. There are hundreds of hooks that can be used as triggers for a plugin, and you can even create new ones if needed.
But for now, there are two types of hooks that you’ll need to consider when creating your plugin:
- Actions: These add or change WordPress functionality and make up the majority of hooks.
- Filters: These are used to modify the functionality of actions.
To code your plugin, you’ll need to familiarize yourself with hooks and how they work. Fortunately, the Plugin Handbook from WordPress can help you get started.
For this guide, we’ll use the following code (source) as an example:
function modify_read_more_link() {
    return '<a class="more-link" href="' . get_permalink() . '">Click to Read!</a>';
}
add_filter( 'the_content_more_link', 'modify_read_more_link' );
As you might be able to see, this code uses a filter to modify the standard “read more” link by replacing it with a different value: “Click to Read!”
If you add this snippet to your PHP file and activate the plugin on your site, you’ll end up seeing the following anchor text below your post excerpts:

Feel free to experiment with the code and try using a different function.
Note that you could also add this code to your theme’s functions.php file. This file contains code that adds functionality to your site and works in a way that’s similar to how a plugin adds functionality. However, if you switch to a different theme in the future — or your theme is upgraded to a new version — you’ll lose these changes.
This kind of code works only for Classic themes. Block themes work differently and often require no PHP code since everything is built using Blocks using only the Site Editor.
Also note that the code in the example plugin above works only for sites utilizing classic themes. If you’ve been using the site editor built into WordPress — which has been in the core software for several years now — to lay out your site using blocks, the code above won’t do much for you.
Related: How To Install A WordPress Theme (Tutorial)
Step 5: Test Your Plugin
As you continue developing your plugin, it’s important that you save your work often and test your changes on your staging or development site.
Once you’re satisfied with your plugin, you should try it on a live site. Again, you’ll want to make sure that you’ve already thoroughly tested your plugin for any bugs and vulnerabilities.
It’s also a good idea to create a backup of your live site before testing your plugin on it. This way, if anything does go wrong, you can restore your content.
If you’re happy with the performance of your plugin at this point, you could offer it to other developers for them to use and test. This can earn you valuable feedback. You could also ask them to put your plugin through its paces and try to break it to prove its stability.
To do this, you’ll want to export your plugin to a zip file for easy distribution and installation. Locate your plugin’s folder in the site’s directory, then right-click on it and follow the steps to create a zip file. For example, on Microsoft Windows select Send to > Compressed (zipped) folder.
Choose a destination, and the files within your folder will be compiled into a zip folder that you can easily share. If you’re developing on a live site, you may need to first download the plugin folder from your SFTP client before compressing it.
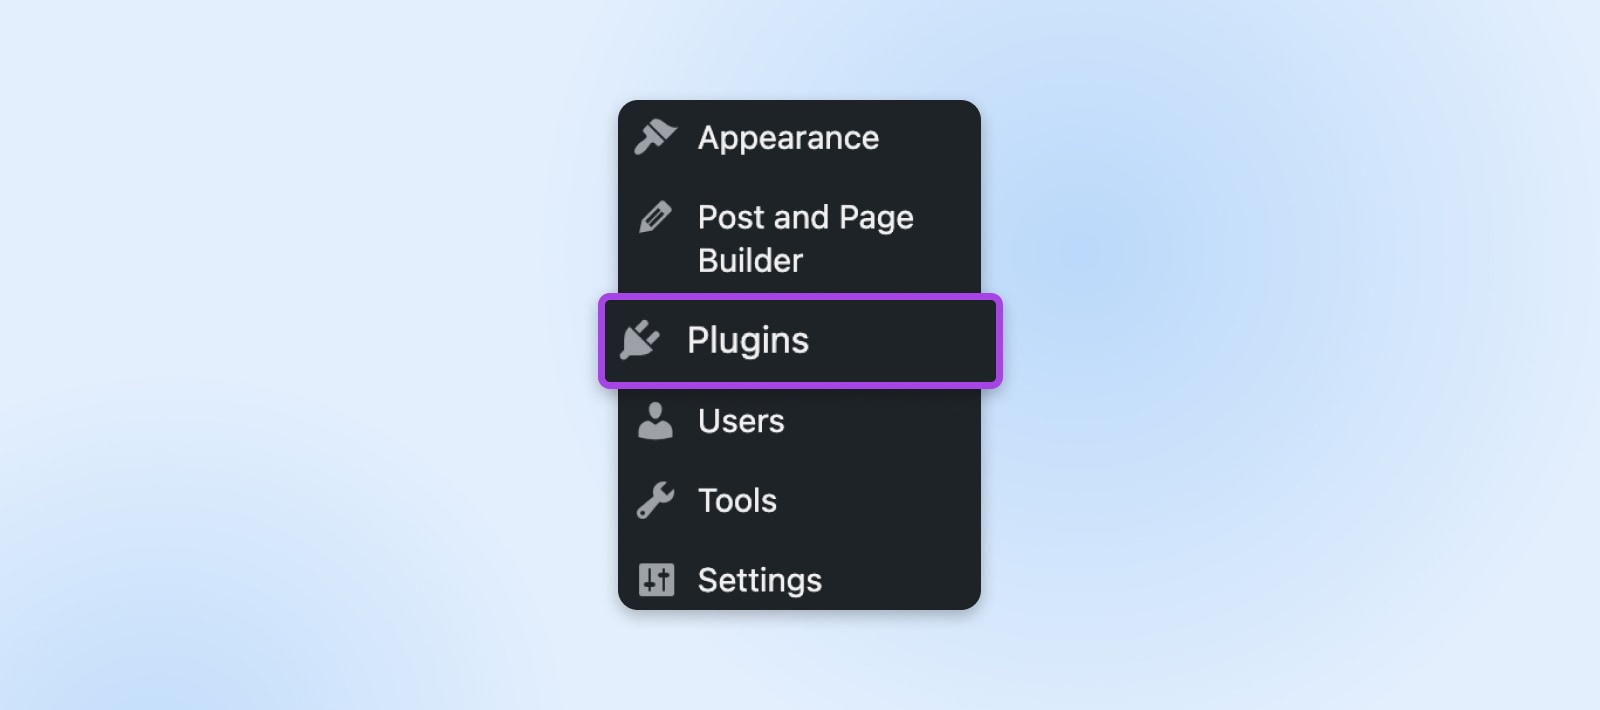
To install your plugin on a WordPress site, simply navigate to Plugins > Add New Plugin from the sidebar in your WordPress admin panel.

At the top of the page, you’ll see a button to Upload Plugin. Once selected, you’ll be prompted to choose a zip file to upload to your site.
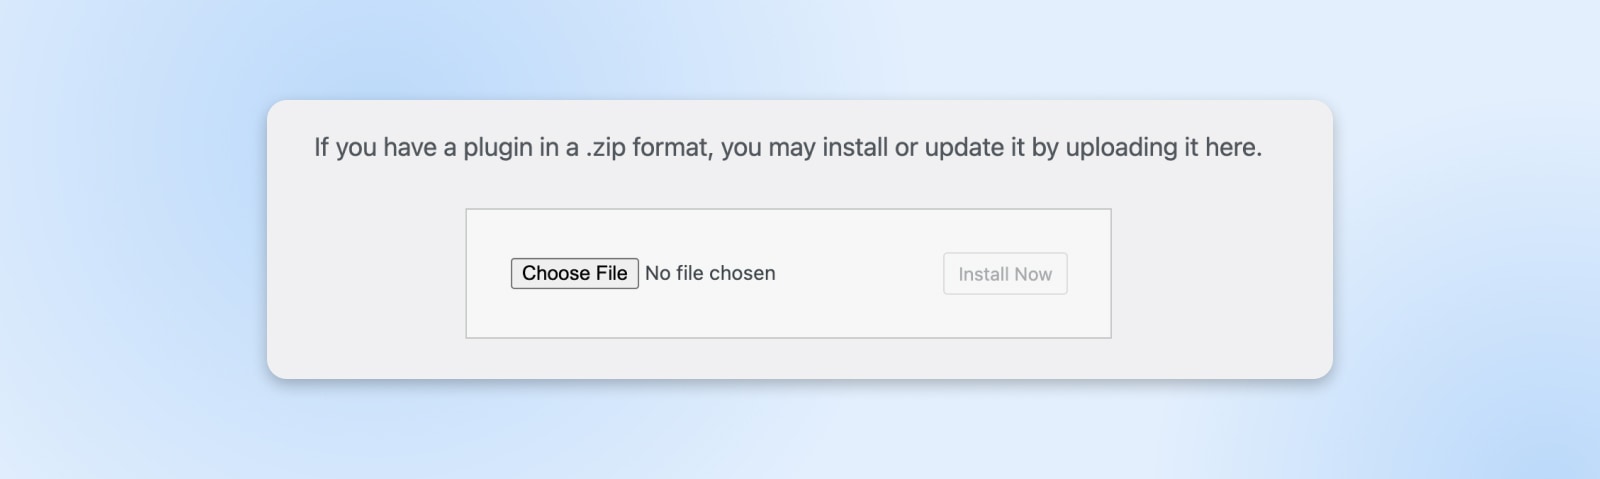
Upload the compressed file you just made and select Install Now. WordPress will then unpack and install the plugin on your site.
Once that’s complete, just click on Activate Plugin.
Your new plugin is now live!
Step 6: Distribute Your Plugin (2 Options)
Now, you can start distributing the plugin you’ve created. Let’s look at the best ways to do this.
A. Publish Your Work To The WordPress Plugin Directory
By adding your plugin to the WordPress plugin directory, you can share your work with the community and gain exposure. You can take advantage of the WordPress user base to attract new clients.
However, you’ll need to make sure that your plugin complies with best practices and the Detailed Plugin Guidelines before uploading it for review. Keep in mind, it might take a while for your plugin to be reviewed and accepted.
Once your plugin is approved, you’ll need to add your files to the Subversion directory.
When this is all done, WordPress users will be able to install your plugin on their sites.
B. Share The Plugin On Your Own Website
In addition to uploading your plugin to the WordPress directory, you could also create a website for it.
You can use a site like this to market and provide more details about your plugin. You could also include documentation, tutorials, support options, links to other plugins you’ve made, and so on.
Developers often use websites to promote their premium plugins while providing a free or “lite” version in the WordPress directory. That way, users are able to easily find and download the product via WordPress before upgrading to a paid option.
You can lock certain advanced features behind a paywall, which can all be explained on a plugin website. Additionally, you can offer a multi-tiered membership model that offers a variety of feature sets depending on a user’s needs and budget.
Set Yourself Up For Plugin Success With DreamHost
As an open-source platform, WordPress enables you to develop your own plugin and share it with other users. While some coding knowledge will certainly be helpful, you can easily create a simple plugin and vastly improve your site’s functionality by following the steps above.
Once you’ve gained enough experience, you may even want to start selling premium versions of your plugins for a rewarding and mostly passive income stream!
But to really set yourself up for success, you need to be able to spin up an affordable plugin testing site — DreamPress can help you with that — as well as one or more marketing sites to display and sell your premium plugins. Use our AI-powered business name generator, affordable domain name finding and registration service, and WordPress-specific website builder to go from plugin idea to viable side hustle with ease!
Do More with DreamPress
DreamPress Plus and Pro users get access to Jetpack Professional (and 200+ premium themes) at no added cost!