Email Authentication: How To Avoid The Spam Folder
A survey of email marketing strategies around the world found that for every dollar spent, the average American business made $36. In the EU and UK combined, the return on investment (ROI) is more like $41 for every dollar — possibly due to solid privacy regulations that help prevent spam.
So it’s no surprise the same study found that a massive 87% of brands call email “very critical” to the success of their overall business.
If you haven’t yet delved into the world of email to attract and retain a solid customer base, stop here and go read our very comprehensive email marketing guide first.
When you’re ready to refine your email marketing program and further increase ROI, we’ll show you how in this guide to setting up email authentication to improve deliverability and protect your customers.
- What Is Email Authentication?
- Do I Need Authentication If I Use An Email Marketing Platform?
- Why You Should Authenticate Emails (One Word: Spam!)
- The 3 Core Elements Of Email Authentication
- How To Set Up Email Authentication (4 Steps)
- Final Note: What About BIMI?
- Need Help On Your Email Authentication Journey?
What Is Email Authentication?
First, a little clarification before we begin. Inbox service providers (ISPs) including Gmail, Yahoo, etc. are sometimes lumped in with email service providers (ESPs) like Mailchimp. However, we think it’s important to differentiate between free ISPs that are meant for personal use and paid ESPs that focus on email marketing.
Alright, now let’s dive in.
Email authentication, or email validation, is a process ESPs put into place to filter out as much spam, phishing, scamming, spoofing, and other malicious action as possible before it hits inboxes.
The steps involved in editing your domain name system (DNS) settings to enable the three most widely-embraced email authentication methods on your website — SPF, DKIM, and DMARC — put security processes in place to confirm the source and legitimacy of an email sender and message.
DNS
The Domain Name System (DNS) protocol keeps records of which domain names correspond to specific IP addresses. DNS enables you to browse the web by typing in regular URLs instead of IP addresses.
Read MoreToday, all legitimate ISPs and most ESPs look for as many of the above protocols as possible attached to email messages before they deliver them. If you don’t put them in place correctly, it raises red flags that you may not be a trustworthy sender. That can cause your messages to be relegated to the spam folder, or never even delivered at all.
Seem like overkill?
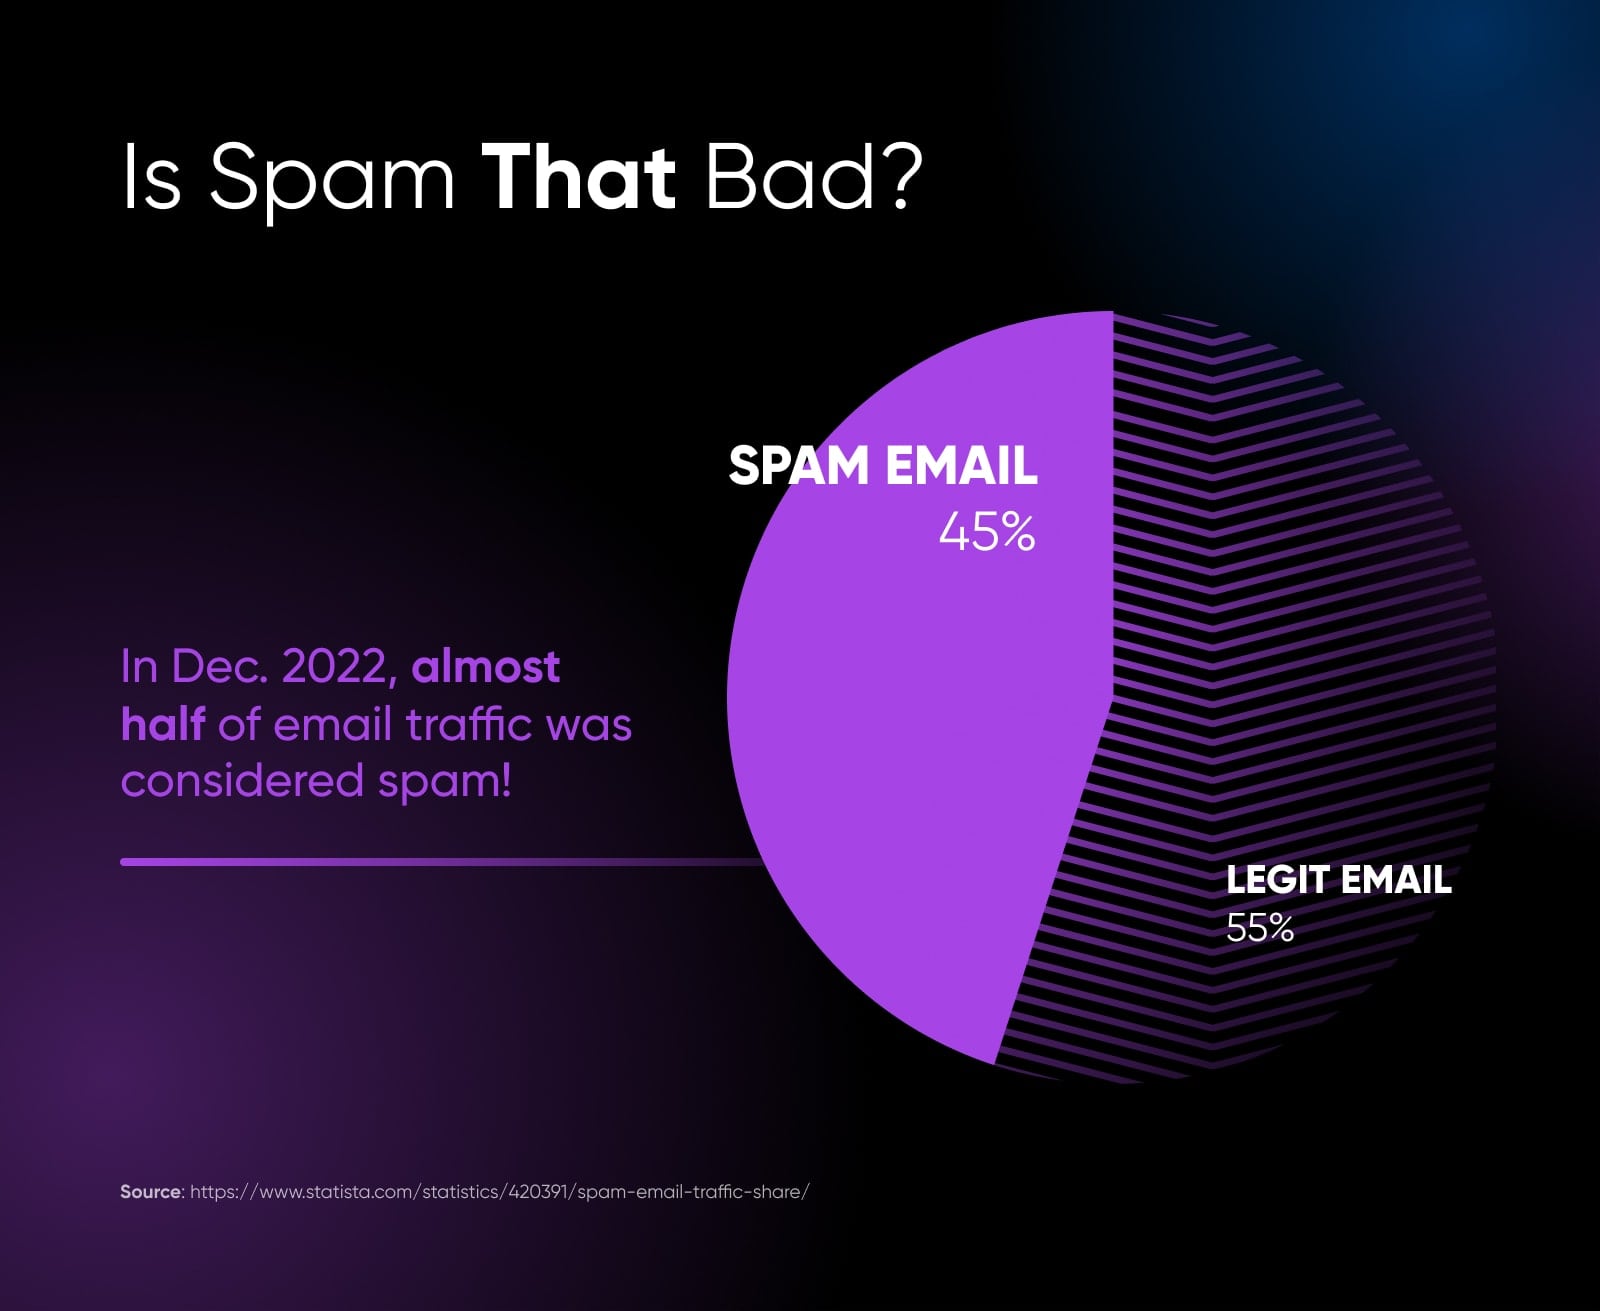
That’s easy to think when you’re not aware of how much spam email is flying around the internet every day — which is precisely because email authentication is working as intended.
Do I Need Authentication If I Use An Email Marketing Platform?
Let’s get this out of the way at the top. Simply, yes, you should still set up email authentication via your website even when using a trusted ESP, aka email marketing platform.
With Mailchimp for example — we keep going back to them because they’re well known and have lots of helpful documentation on this matter — users with domains that are not hosted by Mailchimp are encouraged to set up their own email authentication. This is because Mailchimp enables authenticated email on their hosted domains by default, as do many domain hosting solutions, including DreamHost (DreamHost email actually works with any domain you own!).
This is probably the time to note that you should check with your domain host on whether or not email authentication is already set up on your website. We should also make it clear that you can only secure email authentication on domains you own — there’s no authenticating Gmail, Yahoo, and other ISP addresses. Being able to authenticate your emails is just one several reasons why we’re proponents of small businesses having custom email addresses.
Get Content Delivered Straight to Your Inbox
Subscribe to our blog and receive great content just like this delivered straight to your inbox.
Why You Should Authenticate Emails (One Word: Spam!)
As we touched on above, there’s a lot of spam being sent every day.
And not just that, there are even more malicious messages looking to worm their way into your inbox.
Gmail alone blocks over 100 million phishing attempts daily.
Phishing is a deception strategy where the sender pretends to be a reputable person or brand in order to get sensitive information out of the recipient, such as credit card details, social security information, and so on. Spoofing is the element of phishing where the attacker makes themselves seem trustworthy by hiding their real email address, IP address, domain name, or other information behind a more trustworthy name or address. This makes recipients more likely to respond or click on something and get pulled further into the scam.
With that, it’s easy to see why email authentication is critical. But let’s break down how killing spam and scams is ideal for both recipients (that’s your customers) as well as senders (that’s you!)
Protect Your Subscribers & Brand Reputation
If email authentication didn’t exist, spammers could alter the true source of emails, easily evading spam filters and annoyingly flooding inboxes.
Worse, phishing scams that manipulate things like the sender’s email address, branding, and even links to make them look like a legitimate company — like your company — would be even more rampant.
Should a phishing attack successfully impersonate you or your business and steal passwords or account numbers from customers, that could seriously negatively impact their lives and lead to a loss of trust in your brand, sales, retention, and overall business success.
Secure Sender Score To Improve Email Deliverability
Sender score, or sender reputation, is a grade that ISPs and ESPs give organizations that send email.
A sender’s email reputation plays a crucial role in determining whether the mailbox provider will deliver emails directly, or relegate them to spam folders. The higher this score, the stronger the reputation and more likely it is that the sender’s email will be delivered as expected.
When an email is marked as spam or a phishing attempt, it dings this score — but when an email is delivered to an inbox, opened, and engaged with, this score goes up.
Email authentication is a major factor in this score and in getting ISPs and ESPs to deliver your mail in the first place. It’s the first step toward improving deliverability. Deliverability is critical because if customers aren’t actually seeing your marketing emails, the time and money spent on them is a total waste.
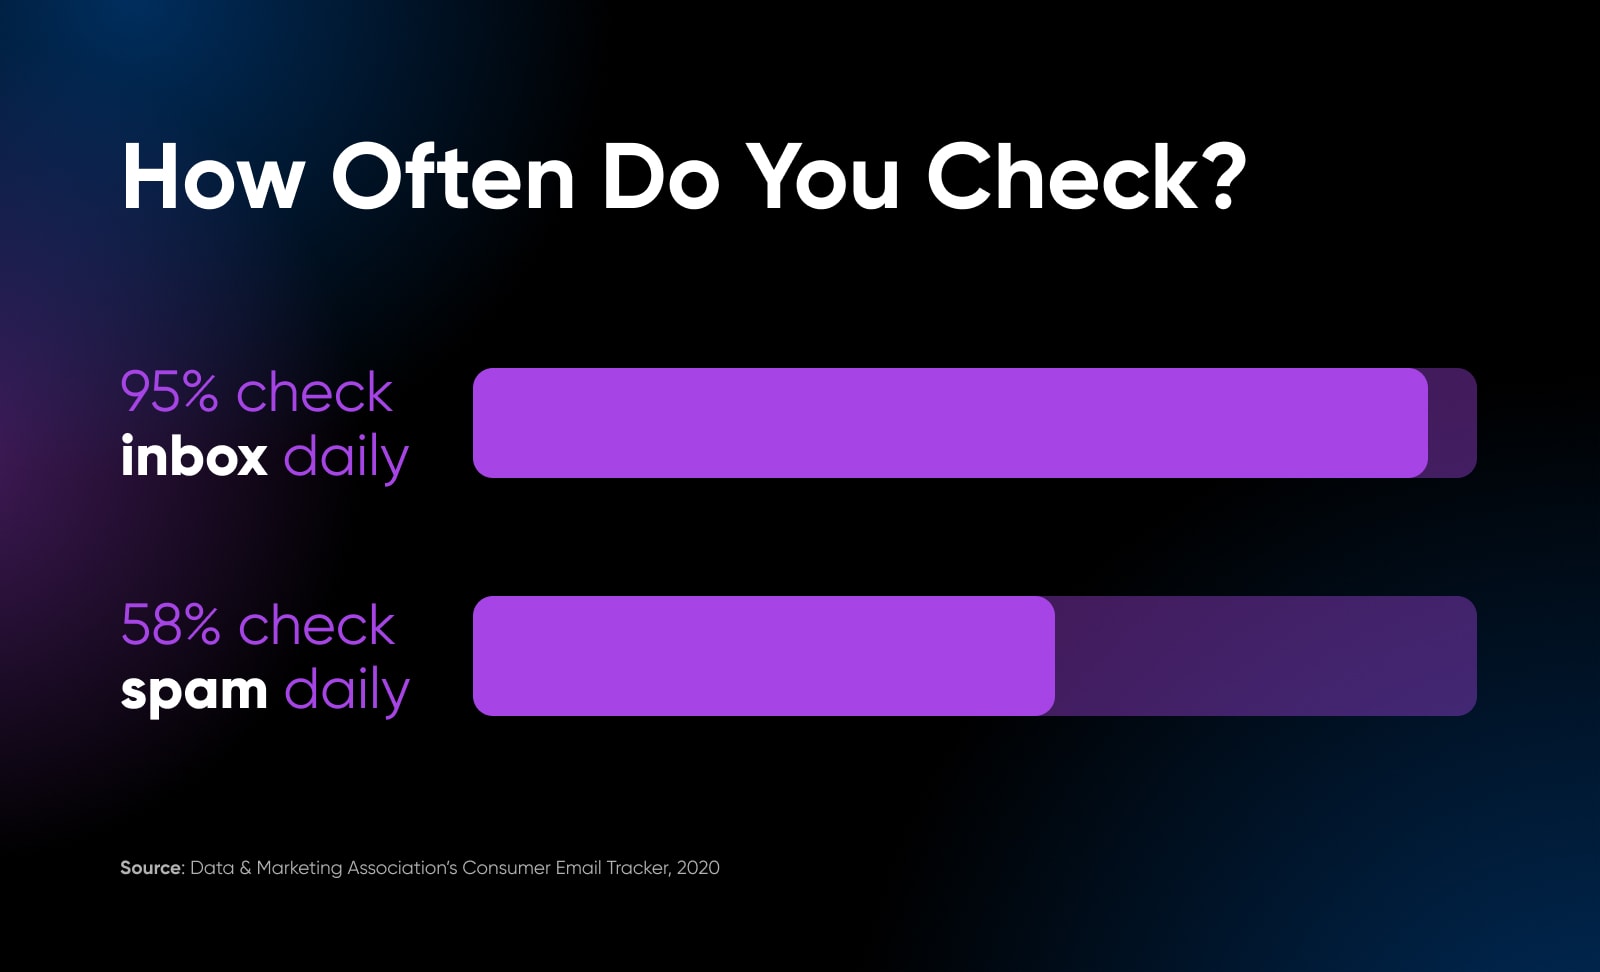
And if your emails are landing in their spam folders instead of their inboxes, folks are a lot less likely to be seeing them.
Related reading: Say Goodbye To Spam! A Complete Guide To reCAPTCHA
The 3 Core Elements Of Email Authentication
Now, let’s really get to know the essential puzzle pieces that, when put together correctly (more on that in the next section), create a strong shield of email authentication.
Sender Policy Framework
Originating in the early 2000s, sender policy framework (SPF) was the initial email authentication protocol. It verifies that the mail server sending an email is authorized to send that email from the domain it claims to be from.
DomainKeys Identified Mail
DomainKeys identified mail (DKIM) utilizes a private key stored in your domain and a public key registered in the DNS. The mail server that gets the email checks with your domain that the public key they received aligns with the private key. If they match, this verifies that nobody is impersonating you or your website via a spoofing scheme. Mismatched keys usually lead to an email being marked as spam.
Today, DKIM is considered the bar that emails need to meet to be trusted by most ISPs and ESPs. Messages sent without SPF and/or DKIM will usually throw up red flags and require additional scrutiny before delivery.
Domain Message Authentication Reporting And Conformance
The domain message authentication reporting and conformance (DMARC) protocol empowers domain owners by streamlining SPF and DKIM management.
A website owner creates what’s called a DMARC policy and installs it as a DNS record. This policy signals to the recipient that SPF and DKIM are in place for the incoming email. If an email fails to be authenticated, DMARC tells recipients what to do with the email — such as deliver it to the spam folder or to not deliver it at all. It also tells the recipient to notify the sender about how the email was delivered. Through these reports, you can see how your email authentication protocols are performing and make any tweaks necessary to ensure deliverability.
How To Set Up Email Authentication (4 Steps)
Now that you have the background on how the building blocks of email authentication work, it’s time to learn how to install them in the right order and test their functionality.
Step 1. Add SPF Record To Your DNS
First up, let’s add an SPF record to your DNS. The SPF record is what will denote which IP addresses and domains can send emails from your domain.
First, gather up all the IP addresses that will be sending emails from your domain. You must also include any third-party domains sending emails on your behalf — such as Mailchimp.
Now, it’s time to add a TXT DNS record. This process will look different depending on your web hosting provider. For DreamHost customers, here are instructions on how to add DNS records.
Be sure to select TXT as the record type. For the record value, you’re going to start with this snippet of code: v=spf1 ip4:[IP ADDRESS] -all
Replace [IP ADDRESS] with any IP address that has permission to send emails from your domain. To add more than one, make a space after the first IP address, start with ip4: again, and enter the next IP address. After the IP address(s), you must include the domain for any ESP that’s sending email on your behalf. For example, that’s “spf.mandrillapp.com” for Mailchimp. Your ESP should be able to give you this information.
Altogether, your record value should look something like:
v=spf1 ip4:00.00.00.00 ip4:00.00.00.00 include:spf.example.com -all
Save the record and restart your DNS server to install this first step of email authentication.
Step 2. Configure DKIM Keys And Add To DNS
Implementing DKIM is a good next step as it builds upon SPF and, as noted, is pretty much expected when it comes to modern email security.
The process of creating the keys you need all starts with your ESP, and will vary depending on which one you use.
Generally, what will happen is you’ll be prompted by your ESP to complete some type of domain authentication, which just tells them you and your domain are legit and you’re authorized to use your website to send emails. After this, you should be able to access a public domain key, which is a very long string of numbers, letters, and symbols. Since DKIM is all about matching up two keys, the ESP will likely hold on to a different but matching private version of this key.
With that, we’re going back into your DNS settings and adding another TXT record.
The value for this record will be the public key you just grabbed from your ESP.
That’s it! As always, save your new record and restart your DNS to get the changes into effect.
Step 3. Set Up DMARC DNS Record To Secure Authentication
DMARC should be set up 48 hours after SPF and DKIM have already been installed. So once you’re a few days out, here’s the last DNS record you need to add to round out the authentication trifecta.
The DNS record type will again be TXT. If there’s a time to live (TTL) field, we suggest setting it to one hour.
The value field is where you’re going to put your policy. If you’re new to this, we recommend following Google’s guide to rolling out DMARC and using a policy with no enforcement, such as:
v=DMARC1; p=none; rua=mailto:[EMAIL ADDRESS]
Fill in an email address that you can trust will get checked regularly.
When you’re done, you can save the record and restart your DNS server for the last time for a while.
Going with the example policy above will allow you to get reports on email performance without messages getting marked as spam. These reports will tell you how well your emails are passing authentication checks and whether you need to make any adjustments. Google says to stick with this lenient policy for at least a week. When you’re comfortable, you can slowly change up your policy to be more specific. To learn more about timing and structuring your DMARC policies, we recommend checking out the Google tutorial on DMARC.
Step 4. Check That Your Emails Are Authenticated
Finally, it’s time to verify email authentication status!
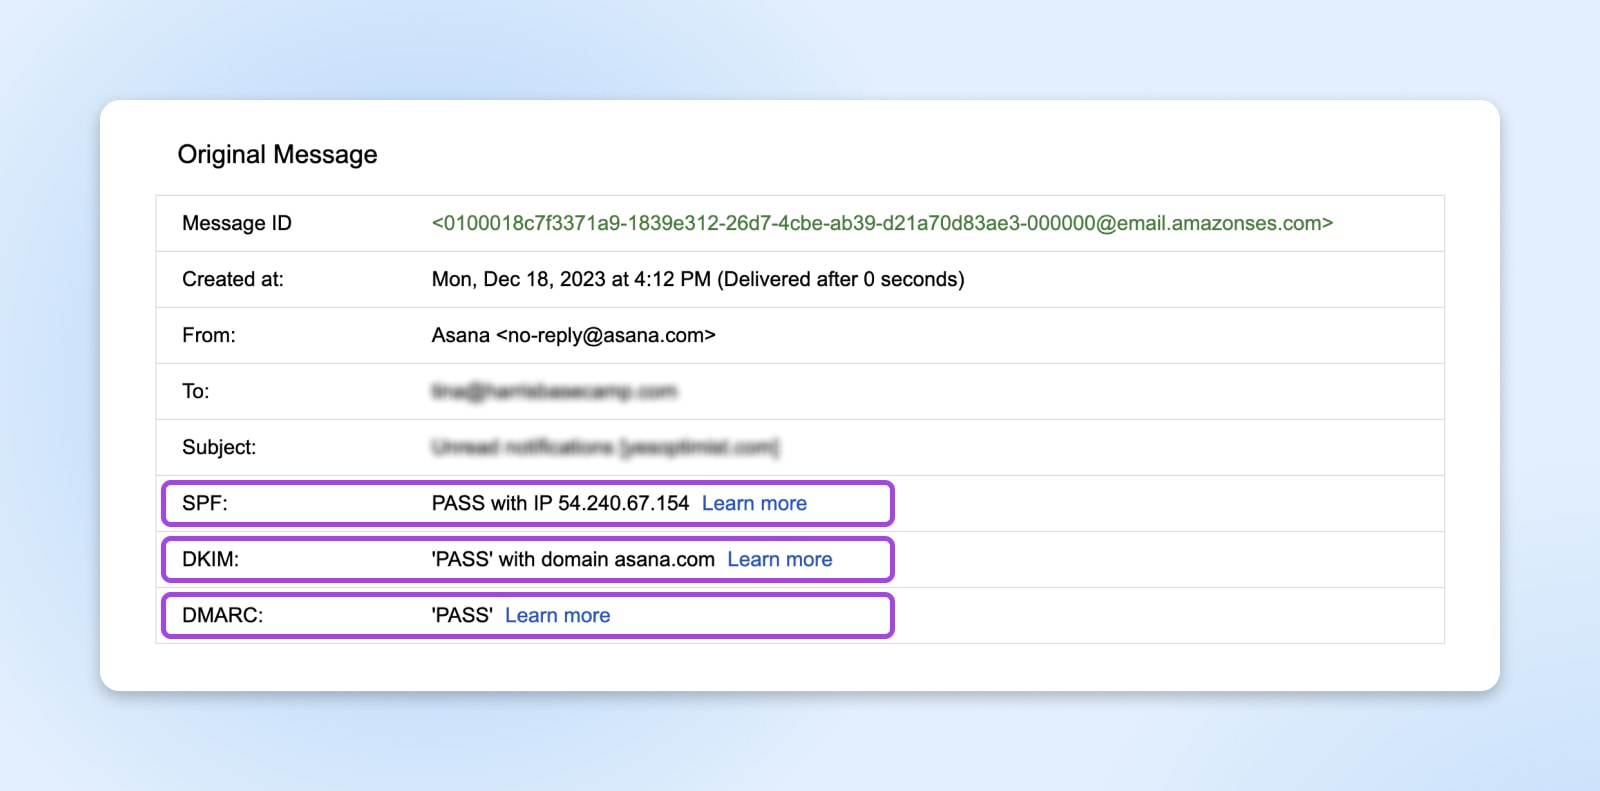
You can do this by sending an email from the domain where you added all the DNS records, and then observing whether the correct SPF, DKIM, and DMARC messaging is attached.
In Gmail, open the message, look at the top right corner (where the sent time is displayed), and look for the triple-dot menu. After clicking on that, find and select <> Show original.
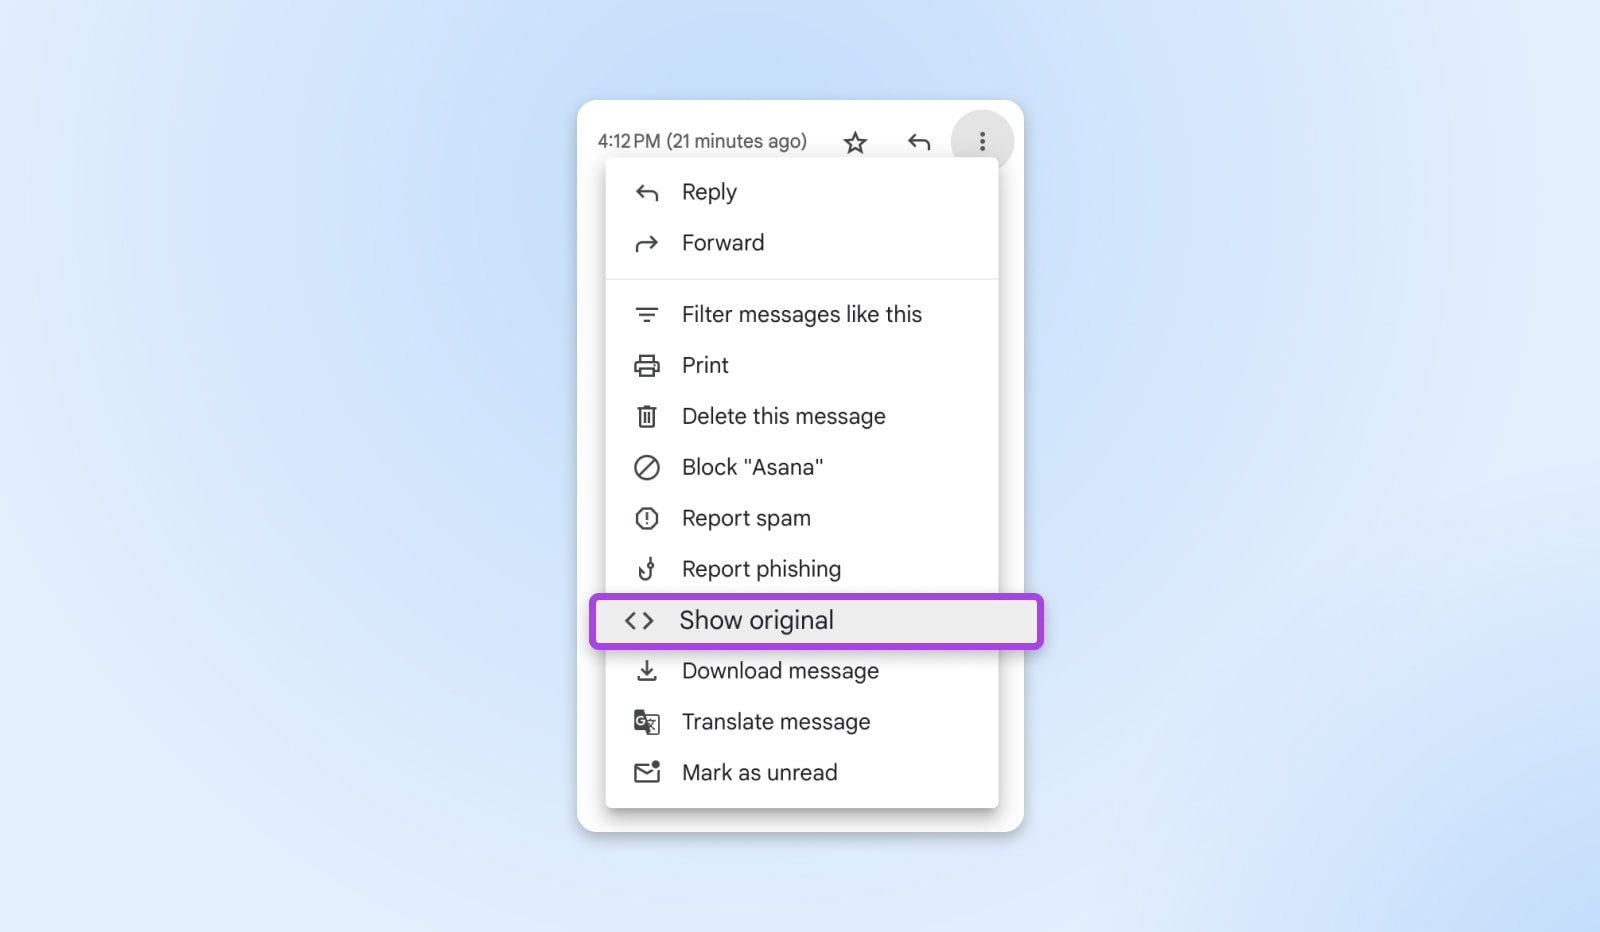
A new tab will open with all the details of the email, including any attached SPF, DKIM, and DMARC information at the top.
Final Note: What About BIMI?
One last thing. You may have heard of brand indicators for message identification (BIMI).
This is one last email authentication protocol that enables the sender to include a branded image with an email for yet another stamp of legitimacy.
This practice was introduced in 2020 but hasn’t gained widespread adoption. Why? Because of cost.
Some email services (including Gmail) require a BIMI record to contain a verified mark certificate (VMC). Right now, those go for more than $1K per year, so among small and even medium-sized businesses that don’t feel the need for that expensive fourth layer of protection, BIMI isn’t a priority.
If you’re interested in learning more about this newest email authentication method and how it’s implemented, Selzy has a robust guide to BIMI.
Need Help On Your Email Authentication Journey?
Wow, if you stuck with us throughout this whole guide and now have your email authentication set up, congratulations!
That’s a huge accomplishment and investment in the success of your email marketing campaigns.
But, if you found yourself getting hung up and looking for more guidance, that’s more than understandable.
We built DreamHost to remove the barriers to business website ownership. That’s why, in addition to fast and reliable hosting options, we also have a pro services team that can help you with any of the technical tasks you can’t — or don’t want to — handle.
Need a little support getting email authentication off the ground so you can keep sales up and customers safe from malicious threats? Put some time on our calendar, we’d love to meet you!
Get Professional Email @yourdomain
Promote your website with every message you send when you set up professional email that matches your domain with DreamHost.